Fiskars Reel Mower Maintenance Blade Kit Πακέτο 1

Brand:Fiskars

3.5/5

Ft
71.08

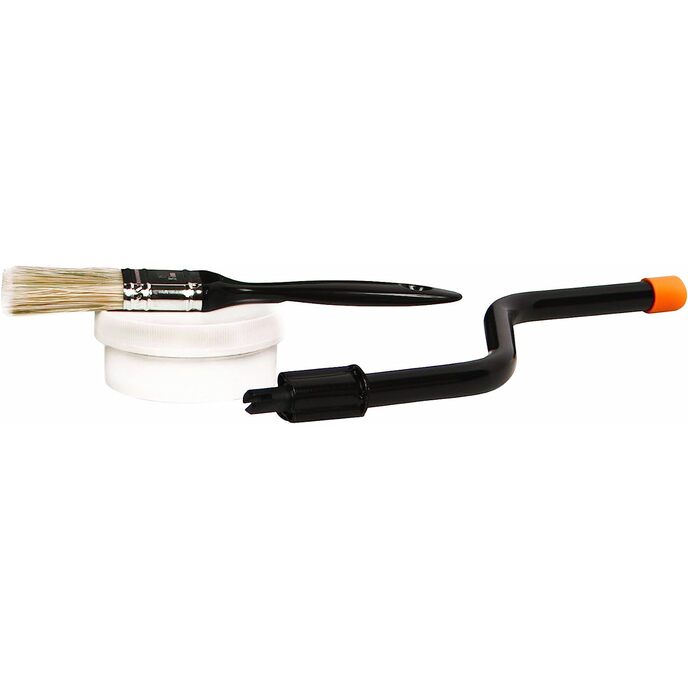
Το κιτ συντήρησης λεπίδων κουρέματος ρολού περιλαμβάνει όλα όσα χρειάζεστε για να επαναφέρετε τις λεπίδες θεριστικού τροχού σε σαν καινούργια κατάσταση, είτε διαθέτετε ένα παραδοσιακό χλοοκοπτικό με ρολό επαφής που απαιτεί ετήσιο ακόνισμα είτε ένα από τα χορτοκοπτικά μας StaySharp Reel που έχει χρησιμοποιηθεί βαριά εδώ και πολλά χρόνια. Απλώς εφαρμόστε την ένωση περιτύλιξης στις λεπίδες του καρουλιού κοπής με τη βούρτσα εφαρμογής και χρησιμοποιήστε τη μανιβέλα χειρός ή το εξάρτημα του ηλεκτρικού τρυπανιού για να περιστρέψετε το καρούλι προς τα πίσω μέχρι να αποκατασταθούν οι λεπίδες.

Εγγύηση εφ 'όρου ζωής. Για να το χρησιμοποιήσετε, εφαρμόστε την ένωση περιτύλιξης στις λεπίδες με τη βούρτσα και χρησιμοποιήστε τη μανιβέλα χειρός για να περιστρέψετε το καρούλι προς τα πίσω. Περιλαμβάνει ένωση περιτύλιξης, βούρτσα εφαρμογής, δύο εξαρτήματα, μανιβέλα χειρός και οδηγίες βήμα προς βήμα. Ιδανικό για την αποκατάσταση των λεπίδων της Fiskars StaySharp Max Reel Mower, StaySharp Plus Reel Mower, StaySharp Reel Mower και των περισσότερων άλλων χλοοκοπτικών με καρούλια.
Country of Origin China
Customer Reviews 4.4 4.4 out of 5 stars 498 ratings 4.4 out of 5 stars
Domestic Shipping Item can be shipped within U.S.
International Shipping This item can be shipped to select countries outside of the U.S. Learn More
Is Discontinued By Manufacturer No
Item model number 362150-1001
Item Weight 1.28 pounds
Manufacturer Fiskars Garden
Product Dimensions 11.38 x 5.75 x 1.97 inches

3.5

10 Review
5 Star
66
4 Star
21
3 Star
7
2 Star
4
1 Star
3

Γράψτε την κριτική σας

Το email σας δεν θα δημοσιευτεί. Όλα τα υποχρεωτικά πεδία επισημαίνονται με*

Scritto da: Adam
Good but too expensive.
Good kit but you can just get a 33mm socket and a drill to spin the blades, and backlapping conpound off ebay for 1/3 of the price
Scritto da: PMCZ78
Very good item fo my lawnmover
Everything was allright
Scritto da: Glenn Johnson Scheper
Love-Hate relationship with Fiskars StaySharp Max Reel Mower and now also with their sharpening kit.
The media could not be loaded. Just like using their mower, you have to be really committed to use the Fiskars Reel Mower Maintenance Blade Kit. The attached fast real-life sharpening exploration/demonstration video was filmed over a period of about an hour really, and was the second day of trying to sharpen my Fiskars StaySharp Max Reel Mower. The enclosed instructions refer you to the owner's manual about how to adjust the blade; Which is just wrong for Fiskars not to document better about their own Fiskars StaySharp Max Reel Mower model; For this reason, On day one, I loosened the wrong things, also during which I spoiled the blade adjustment screws. Nevertheless, we tough it through with some ad-hoc tools, and achieved a reasonable accuracy of blade setting. The actual process of lapping was much fun (I love tools); just watching how the grit removed metal so well; You can see how, in just the first few turns of the reel, the situation changed from hard-to-turn to rotating easily. Most places of most blades of the reel can now cut a piece of paper, which was thinner than they said to use. Before sharpening, I could not push this damage-deformed mower very well, and it did not cut grass very well. Tomorrow I intend to do my first mowing of some 6000 sq ft of Bermuda grass, just coming out of dormancy. Glenn Johnson Scheper, Texas.
Scritto da: Scott J. Satkowiak
It's okay depending how easy you can attach it.
I am a 2 year owner of the stay sharp Fiskars mower. I will tell you that it will need sharpening each season. In fact, after sharpening it this season I am convinced that it doesn't even come very sharp brand new. I bought this without understanding how you sharpen these blades. If I had known I would have just went for the sharpening compound. There is no secret science to sharpening these blades. The instructions are more akin for the PLus mower I think and it leaves regular stay-sharp up for you to figure out. That said, you have to take the chain guard off, remove the master link from the chain, remove the sprocket on the blade spindle and then attach the crank where the sprocket was. My problem was that the sprocket set screw hole had chaffing on the edge and it made the sprocket impossible to get off without taking a drill and deburring the edges of the hole. After that, I got the sprocket off and I could easily attach the crank. The rest of the process is a matter of applying the lapping compound and spinning it in the opposite direction that it cuts. After that, you have to adjust the bottom stationary shear till in barely touches the top moving blades. It should cut paper like a nice new pair of scissors. It's not an easy job. It requires allen wrenches, screw drivers, sockets. But the crazy thing is that all it is intended to do is allow you to spin the gear backwards for a long period of time. That is how it uses the pumice in the compound to sharpen the blade. But after you remove the gear cover you will find TWO holes in the rear sprocket that you can stick a screw driver in and spin the front blades in reverse to achieve the same results. No need for the fancy crank that is almost IMPOSSIBLE to install if you have my same experience. Honestly, I gave up and then realized, all I had to do was spin it backwards my own way. This idea is good. It gives the user a safe way of spinning the blades in reverse or forward for a long period of time and if you don't have trouble getting the sprocket off then you are good to go. I wish they had just worked together with the rest of the design team on this one. It should come with the mower and it shouldn't be so damn hard to attach.
Scritto da: Ariel
Works well; process requires patience (not the product's fault, though!)
I watched a few videos online and realized that I wanted to buy this kit rather than McGuyver my own method of turning the blades on my Fiskars mower (people use short pieces of rubber hose + hose clamps to attach to a drill, or they reposition the chain so you push the mower around to make the blades go backwards and sharpen themselves). My blades were pretty dull, so I had to do the process twice before they would cut strips of paper. Sharpening your own reel mower's blades is certainly do-able, though you may have a learning curve like I did that involved attending a bit of The University of YouTube on the subject. It may seem like a lot of money for a handle, a paintbrush, and some lapping compound, but the handle is made for my particular mower by Fiskars, and it was convenient to wait a few days to get everything I needed in one box rather than have to run to three different stores. I have heard that the lapping compound may dry out if you don't seal it up well; I put it in a ziploc bag and hope that'll do the trick. Another tip: put some newspaper down to catch splattered lapping compound, wear clothes you don't care about, and wear eye protection for sure. I also wore some hearing protection, as the scraping sound is pretty loud and harsh. I also took the opportunity to clean and oil / use BreakFree CLP on the chain and other moving mechanicals on the mower. My mower is now sharp and properly adjusted, and does a great job. I like that I am holding out and using my body to drive the mower instead of stinky, dangerous fossil fuels, and making a loud noise in my neighborhood. I can't imagine an electric mower doing a better job than my properly-maintained Fiskars reel mower.
Scritto da: MomsTheWord
kind of confusing
My reel mower was several years old and not cutting as well as it should so I grabbed the manual that came with it and found that it suggested this maintenance blade kit, so I purchased it and got my mower all freshened up BUT THEN I read in the exact same manual that you shouldn't use this stuff, and the blades should only be sharpened by a machine...soooo why recommend this kit? Anyway, I had already done it, and it does seem to have helped a bit, but I think actually having it sharpened with a machine would get it much closer to the 'brand new' sharpness it had out of the box.
Scritto da: Bruce G. Strang
Got a Fiskar. Get the kit.
Did what it was supposed to do. Make sure you have the original Fiskar instruction booklet handy to make sure you follow the proper steps, like the loosening of bolts before lowering or raising the rotating blade above the cutting bar. I missed that step at first and when I thought I was lowering/raising the blades using the wrench, it was actually doing nothing without the loosening of the other bolts. I had an old American Mower years ago before the Fiskar and had a sharpening kit from Lee Valley. Worked great, but the handle doesn’t fit the Fiskar. I watched a bunch of YouTube vids on how to jerry-rig a solution using a bit of garden hose, bike clamps and an electric drill. Tried it. Gave up. Bit the bullet and bought the Fiskar kit. Skip the YouTube vids and just get the kit. Mind you, I have two and a half tubs of the compound...should last a lifetime.
Scritto da: Amazon Customer
worked alright. Not for the price though
worked alright did 2 applications and it improved slightly. Still kind of need to go over the lawn 2 times to get a good mow but that may be more on the mower then the sharpening compound. And yea I check the blade space by cutting paper after sharpening. it did improve the blades edge but not as much as I would have hoped for the price.
Scritto da: Foxtrot_187
Didn't Notice Any Improvement
Seems a bit overpriced for a crank shaft and some goop with sand in it. Didn't notice any difference on my machine after treatment. (I bought mind second-hand however and I'm starting to think it was a lemon in the first place.)
Scritto da: CGC
Great product
I didn't know how much smoother/better my lawnmower could be until I tried this. It's worth the money, I sharpened mine 5 times and you can't tell I used any product, a little goes a long way.

Σχετικά προϊόντα

Ανακαλύψτε το διεθνές μας δίκτυο

Στέλνουμε σε 28 χώρες, πάνω από 200.000 προϊόντα. Μείνετε ενημερωμένοι, εγγραφείτε στο ενημερωτικό δελτίο.

Array